I just returned from NCC Group’s internal North American conference, a nice respite from the cold East Coast to sunny San Diego. I’m a remote employee, so it’s always a blast getting to hang out with my New York office coworkers and seeing awesome presentations from colleagues from across the country. One of the highlights was the mini-CTF put on by Sid Adukia and Dean Jerkovich.
This CTF consisted of an iOS app bundle compiled to run on the iOS Simulator, thus able to run on any Mac with Xcode and not requiring a jailbroken device. I’ve been doing iOS application pentests for years and it was really cool to see a CTF challenge using this! This is the first one I’ve seen since DVIA came out years ago.
Perhaps the biggest challenge was the fact that this was a Simulator app. Had it been an ARM-compiled iOS app that I could put on a jailbroken device, I would’ve solved a lot of these challenges in a few minutes. Most of my time was spent googling for how to do stuff like dump the keychain or hook methods on the Simulator instead of on a jailbroken device.
I’ve been worried recently just what the future of iOS security is going to look like. It seems we’ve been thrown a few bones in the last month, with Project Zero’s Ian Beer recently publishing the “tfp0” vulnerability and Jonathan Levin publishing LiberiOS, the first jailbreak for versions of iOS 11. But fewer and fewer people are publicly releasing jailbreaks. I don’t blame them either. Due to the enormous sums being offered by exploit brokers, many would argue you’re a moron for giving away million-dollar exploits for free. Someday soon, those of us in iOS security testing might be forced to have our clients compile x86 versions of their apps for us and run them all in the iOS Simulator. The good news is that a surprising number of the same tools and techniques you would normally use on a jailbroken device will also work with a Simulator app on macOS! Some things don’t, but if you’ve ever chased the latest jailbreak and found that half the stuff on Cydia doesn’t yet work for your version of iOS, then you’re already used to life on the bleeding edge.

The iPwnable2 CTF app
NotHardChallenge
Real Client Stories: Since Apple encrypts the iOS application, and also the file system, no one will be able to extract our keys.
This was the easiest one, as the name implies. Sid and Dean came up with a pretty cool build system for the app. For each person or team who registered, their app would be built with unique, randomly-generated flags, preventing anyone from stealing another team or player’s flags.
If you’re unfamiliar with macOS and iOS app bundles, they’re actually just directories with a “.app” extension at the end. You can even right-click on one, select “Show Package Contents,” and open it like any other directory. Inside this bundle is the actual executable, property list files (think of them like config files in Windows or Linux), frameworks and .dylib library files the app uses (akin to DLLs in Windows or .so files in Linux), code signatures, and other supporting files.

The guts of an iOS app bundle
That build.py file doesn’t contain any flags, but does show the code they used to randomly generate them when compiling the app.
What we’re really after is the actual executable itself: the “iPwnable2” file, which is what actually runs when you tap on the app’s icon on an iPhone. All you have to do is run the “strings” utility against it in a terminal and skim through the output.

LeakyPipes
Imagine if top secret data went across the network in the clear!
This one was a little irritating, for a few reasons. Unlike iOS on a real device, the iOS Simulator doesn’t have it’s own network settings. It just follows the system-wide IP, proxy, and DNS settings. That means that, in order to proxy your traffic through something like Burp and see what’s going on, you have to proxy *ALL* your Mac’s traffic and wade through the noise.
So once you’ve set your Mac up to proxy all your traffic through Burp, you have to do two things to successfully proxy the Simulator’s HTTPS traffic through.
In Safari on the Simulator, navigate to http://burp and download Burp’s certificate, click “Allow” to be redirected to the Settings app, and click “Install” a million times through all the warning prompts.
Next, go to the Simulator’s Settings app, click “General,” then “About,” scroll to the bottom of the page and click on “Certificate Trust Settings.” In there, click on the toggle to enable “PortSwigger CA” and click “Continue” at the warning prompt. I forgot that last step and wasted a lot of time wondering why TLS handshakes kept failing.
That said…Burp won’t help you on this challenge! 🙂
Burp helps later, but in this case, Sid and Dean had deliberately written this challenge so that it wouldn’t obey proxy settings. There exist several ways to make web calls in Objective-C and Swift, some of which obey system proxy settings and some of which don’t. Additionally, Apple recently started forcing apps to use TLS for all their web calls. The way Sid explained it, he wrote this challenge to make raw TCP calls instead of using the HTTP/S libraries, circumventing that requirement.
The only way to catch the flag was to run Wireshark, click on the challenge’s entry in the app to generate the network request, then capture and read it. The flag is being submitted as a parameter in an HTTP GET request.

WhatsYourASL
A flag was just logged. That’s safe, right?
Another easy one, with a flag being written to the Apple System Log (ASL). But one caveat: don’t use the “Debug” > “Open System Log…” option in Simulator’s menu. Instead, open Console.app on your Mac and select your virtual iOS device from the “Devices” sidebar. You’ll see the flag written in a log entry by the iPwnable2 process.

UserDefaults
Store it quick and dirty, the default way
Now we start delving into the Simulator device’s file system. For recent versions of Xcode, you’ll find it at:
~/Library/Developer/CoreSimulator/Devices/your-Simulator-device's-UDID/data/
If you’re having trouble with the UDID part, you can run the “instruments -s devices” command in a Terminal to view them for all your Simulator devices or just look for the most recently modified directory.
This directory mirrors what the directory inside an iOS device looks like. Under Containers/Bundle/Application, you’ll find where all user-installed app bundles are stored (what we were just in earlier, running “strings” against the binary). Under Containers/Data/Application, you’ll find all the user-installed apps’ sandbox container directories.
In iOS, every app’s file system access is confined to it’s own little sandbox directory. Think of it like an app’s home directory. It usually consists of Documents, Library, and tmp, with various subfolders and files.
Our first file system flag can be found in the file at Library/Preferences/com.nccgroup.iPwnable2.plist. This sort of file is found in almost every iOS app, with the app’s Uniform Type Identifier (UTI) reverse-DNS-style unique name. It usually contains various settings and configs for the app and sloppy devs are notorious for storing cleartext keys and passwords there.


Doh
This is a gimme. Can’t figure it out? Read some docs!
Another easy one. In fact, the hint really gives it away.
The “MoreFiles” option in the app will create this and the next three flags when you open it.

Just check the Documents folder in the app’s sandbox directory to find the first one. It’s a file named “testObject,” that at first may look like gibberish if you open it in a text editor. This is actually another common Apple filetype called a “binary plist” (rather than the XML style we saw in the last challenge). The “bplist” file header is the dead giveaway. You can easily open this file in Xcode if you give it a “.plist” extension. There’s also plugins for Sublime Text and other editors for viewing them. A third way is to just convert it to XML, using the following terminal command:
plutil -convert xml1 testObject

Transcience
This is securely stored because iOS will delete it. Eventually.
Our second MoreFiles-created flag. This one is hiding in the tmp directory in the “file.dat” file. Another common location for bad apps to store sensitive data at and hope it gets deleted properly.

SoManyPlaces
There are so many places to store things. Where should we cache these files?
The third and final gimme. This one resides in the in the app’s Library/Caches/ folder in the “cachedfile.dat” file.

SecureStore
This time, we know we stored it securely
This is a good example of the sort of challenge that would’ve taken two minutes on a jailbroken iPhone, but took me considerably longer because I had to find out how to do it on the iOS Simulator. The corresponding hint in the app itself was that I should check the keychain.
Like macOS, iOS uses a secure Keychain database to store sensitive information, such as private keys, certificates, passwords, and other information. Apparently, the debug version of the keychain used by the Simulator *used* to be unencrypted and you could just read it with a SQLite database editor. In more recent versions, it’s encrypted just like the iOS version.
In order to more easily decrypt it, we’ll need to install a few tools:
- Frida, an instrumentation tool that lets you inject Javascript into processes
- optool, a tool for interacting with macOS and iOS binaries
- Objection, a “runtime mobile exploration kit,” which is basically a more user-friendly way to run Frida scripts and pre-packaged plugins
Objection and optool can be cloned from their Github repos and Frida is installed via Python by entering “sudo pip install frida” in a terminal.
On a jailbroken device, you would just install the Frida server on the device itself and it’d allow you to hook into any running process or app. But in the Simulator or a non-jailbroken device, we have to download and install a special dylib called “FridaGadget.dylib” in the target’s app bundle and use optool to patch the binary to load it when the app launches.
cd iPwnable2.app/
curl -O https://build.frida.re/frida/ios/lib/FridaGadget.dylib
optool install -c load -p "@executable_path/FridaGadget.dylib" -t iPwnable2
You can either do this in the version of the app bundle already on the simulator under data/Containers/Bundle/Application/<app’s unique identifier>/ or do it on the original you downloaded, then reinstall it on the Simulator. Either way, when you launch your newly-patched version of the app, it’ll hang at a blank white screen. In a terminal window on your Mac, enter the command “sudo objection -N explore” to connect to the listening Frida gadget and launch Objection.
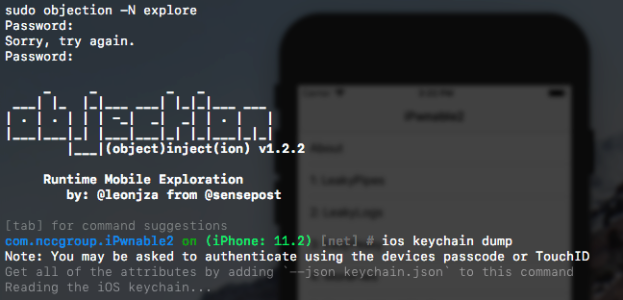
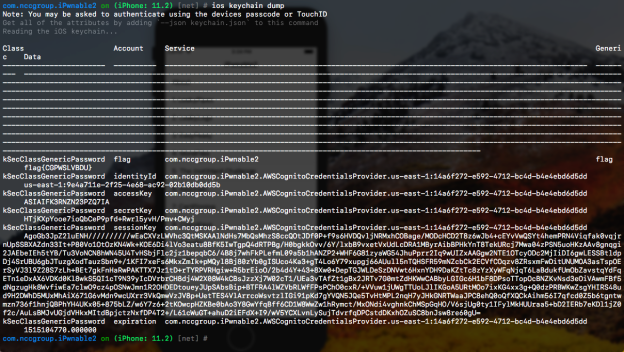
Objection has a very handy tab-completion interface that makes it easy to find new commands. The one we want is “ios keychain dump” to decrypt and display what’s in the Simulator device’s Keychain. As expected, another flag!
PinMyThing
Unpinning pins
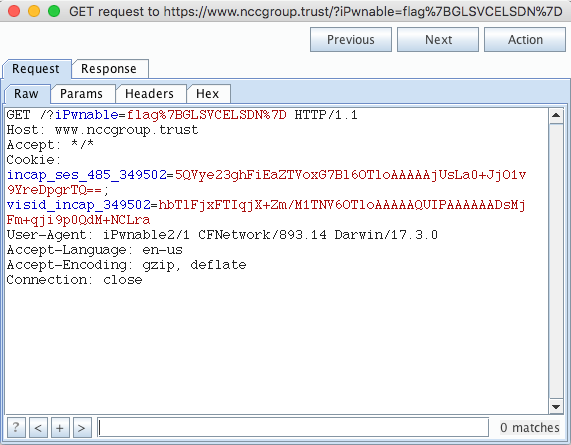
With Objection properly set up, this was easy. I just had to run the “ios sslpinning disable” command inside it and now I was free to proxy HTTPS traffic with Burp Suite.

This one even took me a long time because I forgot to go into the Simulator settings and set the Certificate Trust Settings to allow Burp’s CA. Once that was resolved, going to the CertPinning section of the app caused it to generate the following HTTPS request, with another flag in the URL parameters.
4DigitPin
I bet you could use mechanical Turk for this.. but would you?
I didn’t solve this challenge, unfortunately. I kept thinking maybe I could write some kind of Frida script to interact with the UI and automate brute-forcing the four-digit PIN.
A few others did manage to solve it by reverse-engineering it with Hopper. I suck at reversing though. 😦
CrazyKeys
We heard it’s legal to roll our own crypto in this state
It turns out this was inadvertently broken in the CTF app! The idea was that the flag would be encrypted with a data encryption key (DEK) and left in a plist file called “abc” in the Documents folder (you might’ve spied it in previous screenshots), the DEK encrypted with a key encryption key (KEK), and the KEK left on the disk for the CTF player to find. I saw references to “CrazyKEK” and “CrazyDEK” when dumping strings. The problem, according to Sid, was that these keys were being inadvertently overwritten when using the app, rendering the challenge unsolvable by normal means.
My thought had been that I could use Frida to hook some methods and perhaps make the app spit out the flag unencrypted. Unfortunately, my attempts to dump class methods and find some that sounded promising kept breaking in Objection and I couldn’t find any other way to do it.
Apparently a few other players managed to reverse it via Hopper. Again, I suck at reversing.
Cloudy
Cloudy, with a chance of poor access controls
If you were looking carefully at the Keychain dump from the SecureStore solution, you will have noticed AWS keys sitting in my keychain. Unfortunately, those aren’t some AWS user’s permanent access and secret keys, just temporary keys generated by Amazon Cognito.
Once you have certificate pinning disabled and Burp set up to properly proxy HTTPS traffic, going into the Cloudy section of the app and clicking “Get Mah Files!” will result in an API call to Cognito to get some temporary credentials.

The response will contain a temporary access key, secret key, session token, and an expiration date (in one hour, if you convert the Unix timestamp).

The next request generated will be a call to grab a debug file from an Amazon S3 bucket named “pwnmahbucky” and save it in the app’s tmp directory.

You could just try replaying the request in Burp Repeater, replacing “debug” with “flag,” but this won’t work because of AWS’s rather intricate access control system of keys, tokens, and signatures. What you can do is take those Cognito credentials and use them with the AWS command line interface to view the contents of the S3 bucket. Once you’ve downloaded/installed AWS CLI, you can edit your ~/.aws/config and ~/.aws/credentials files with the IdentityId’s region (“us-east-1”), the access key, secret key, and session token.

NOTE: The session token is necessary. With non-Cognito accounts, I’m used to just running “aws –profile <some name> configure” to set up an AWS profile, but doing it this way won’t prompt for the token. Without the token, you’ll be denied access.
Once you’re set up, you can run…
aws s3 --profile ctf ls s3://pwnmahbucky
…to view the files in the bucket and…
aws s3 --profile ctf sync s3://pwnmahbucky .
…to download them.

And there’s the flag!
Overall, I very fun and unique mini-CTF! Thanks to Sid and Dean for putting it on!
